You see the bricks, you admire the structure, but it’s the mortar doing the grunt work in the shadows. Mortar’s the adhesive that doesn’t just stick bricks together but makes the entire wall a coherent, load-bearing system.
It’s the material that keeps out the weather, absorbs minor shifts, and ultimately determines whether your wall stands tall for decades, or crumbles under pressure.
So, what exactly is bricklaying mortar? And why does it matter so much?
This isn’t just wet sand with a bit of cement thrown in. Mortar has history, chemistry, and strategy.
Whether you’re restoring a listed building in Devon or laying a new garden wall in Leeds, the type of mortar you choose matters a lot. It’s about strength, breathability, flexibility, and compatibility with surrounding materials.
Let’s dig into the different types, what they’re made of, how they behave under pressure, and how to choose the right mix for your specific project. Because getting this wrong? That’s how good brickwork goes bad.
Mortar Basics: What Is It?
Mortar is the matrix between bricks. It bonds them, levels them, and cushions them from movement and moisture.
Unlike concrete, which is meant to be strong and rigid, mortar is designed to be slightly weaker than the brick so that the mortar absorbs stress, not the unit it binds.
Here’s what goes into it:
- Binder – Usually cement, lime, or a mix of both. This is the glue.
- Aggregate – Typically sharp or soft sand, depending on the mix. Provides bulk and texture.
- Water – Activates the chemical bonding process and determines workability.
What makes mortar so different from concrete or grout is its purpose. Concrete is structural on its own.
Grout is for filling voids. Mortar, though, needs to be both adhesive and forgiving. Too hard, and it cracks. Too soft, and it washes out.
The sweet spot? That depends on what you’re building, what the bricks are made of, and how exposed the structure will be.
Also, keep in mind, bricklaying mortar is never just one-size-fits-all. Builders in Scotland may need a frost-resistant mix, while someone restoring a cottage in Oxfordshire will need a breathable lime mortar.
Traditional Mortar Types In The UK
Choosing the right mortar isn’t just about strength, it’s about compatibility with the brick, weather conditions, and load expectations. Here’s a breakdown of the main types used across the UK:
Type M (High-Strength)
- Mix Ratio: 1 part cement: ¼ part lime: 3.5 parts sand
- Strength: ~17.2 MPa
- Use Case: Retaining walls, foundations under heavy loads, driveways with constant weight.
- Notes: Not commonly used in the UK residential sector unless dealing with engineered brick or blockwork that demands serious strength.
Type S (Strong and Workable)
- Mix Ratio: 1:½:4.5
- Strength: ~12 MPa
- Use Case: Below-grade walls, footings, and some structural walls.
- Notes: Still a bit too rigid for older structures. Better for modern builds.
Type N (Balanced Mix)
- Mix Ratio: 1:1:6
- Strength: ~5.2 MPa
- Use Case: General-purpose mortar for above-grade, exposed brickwork.
- Notes: Most commonly used in the UK for domestic bricklaying. Provides a good balance of flexibility and durability.
Type O (Low Strength)
- Mix Ratio: 1:2:9
- Strength: ~2.4 MPa
- Use Case: Repointing, patching, internal walls.
- Notes: Ideal for older homes and non-load-bearing walls.
Lime Mortar (The Heritage Standard)
- Mix: Lime and sand; sometimes with pozzolans or natural hydraulic lime (NHL).
- Strength: Variable but breathable and flexible.
- Use Case: Historic buildings, listed properties, restoration work.
- Notes: Not just traditional, but often legally required in listed buildings. Helps avoid trapping moisture in soft brick.
Picking the wrong type? That’s how many buildings start to show cracking, spalling, and water damage over time.
Mortar Composition: The Science Behind The Mix
Every mortar mix is a bit of a balancing act. Get the ratios right, and you’ll have something that stands the test of time. Get them wrong, and you’re heading back for repairs before the year is out.
Let’s Break Down The Core Ingredients:
- Cement – Brings strength and faster setting times.
- Lime – Adds workability, reduces cracking, and improves breathability.
- Sand – Should be clean and well-graded. Sharp sand gives stronger mortar; soft sand offers a better finish.
- Water – Just enough to make it workable, not soupy.
Additives You Might Encounter:
- Plasticisers – Make the mix smoother and easier to work with.
- Waterproofer – Useful in below-grade applications.
- Pigments – For colour matching in visible joints.
A typical general-purpose mix in the UK is a 1:1:6 (cement:lime: sand). For restoration work? You might be looking at 1:3 lime :sand or even a pure lime putty mix.
Why does this matter? Because the wrong mix leads to either cracking (too hard) or erosion (too soft). For example, using a strong Portland cement mortar on a soft Victorian brick wall? That’s a recipe for long-term damage.
Mortar isn’t just chemistry, it’s craftsmanship. That’s why many experienced bricklayers still eyeball the consistency and adjust on the fly.
How To Choose The Right Mortar For The Job
Think of mortar as matchmaking for materials. Get it right, and your bricks and joints age gracefully together. Get it wrong, and you’re looking at cracks, crumbling joints, and expensive repointing jobs.
Here’s how to decide what works best:
Ask yourself:
- Is it structural or decorative?
- Is the wall exposed to harsh weather?
- Are the bricks soft or dense?
- Is the building modern or historic?
Ideal Pairings:
- New cavity wall (modern bricks): Type N mortar
- Garden wall (exposed to elements): Type S or N, depending on location
- Repointing a Georgian townhouse: Lime mortar
- Foundation blocks in a commercial job: Type M or S
- Interior partition walls: Type O
Also factor in regional conditions:
- Coastal areas: You need more salt-resistant mortar (often lime-heavy)
- Cold climates: A mortar with added flexibility and frost resistance is key
Don’t forget aesthetics. Mortar colour and texture can make or break the look of visible brickwork. If you’re working on a visible façade, test a sample panel first.
And always double-check regulations, especially for heritage projects. Historic England and local councils often have guidelines that dictate allowable materials.
Common Mortar Mistakes & What They Cost You
Even the best bricks won’t save you if your mortar is wrong. Some of the most common blunders?
1. Too Much Cement
- Leads to brittle mortar that doesn’t flex with movement
- Causes stress cracks and damages softer bricks
2. Wrong Sand
- Using general-purpose soft sand when sharp sand is needed weakens the mix
3. Incompatibility With Historic Materials
- Cement-based mortars trap moisture in heritage walls, leading to decay
4. Overly Wet Mix
- Reduces bond strength
- Causes shrinkage during curing
5. Skipping The Test Panel
- Results in poor colour or texture match, especially on restorations
Signs Of Bad Mortar:
- Crumbling joints
- Gaps forming between bricks
- Salt deposits (efflorescence)
- Damp or water ingress
Fixing mortar mistakes isn’t cheap. It often means grinding out and repointing entire sections, a time-consuming and costly process that’s avoidable with good planning and better training.
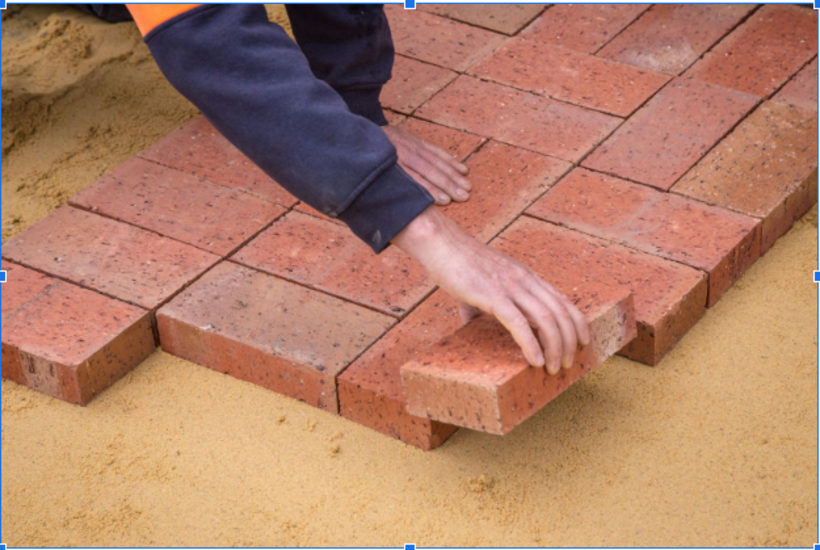
Mixing & Application: Tips For A Consistent, Strong Mortar

There’s an art to mixing mortar that even seasoned builders keep refining.
Basics:
- Use volume ratios, not weight
- Start by dry mixing the sand and binder
- Add water slowly until you get a peanut butter-like consistency
Hand Mixing vs Paddle Mixing:
- Hand mixing is great for small batches and offers more control
- Mixers are best for larger jobs, but can over-mix if you’re not careful
Application Tips:
- Use a clean mortar board
- Don’t overwork the joint, it weakens the bond
- Tool the joint while the mortar is still green (not fully cured)
For heritage jobs, the technique matters even more:
- Compact the joints well
- Avoid smearing onto the brick face
- Use wooden floats for lime mortar instead of steel
Getting a feel for mortar takes time, and it pays off. A poorly laid joint not only looks sloppy but also weakens the wall.
Mortar & Restoration: Blending Old With New
Restoration jobs aren’t just about replacing what’s broken. They’re about respecting the original materials, techniques, and balance of a structure.
Using modern cement mortar on a 19th-century wall? That’s like slapping a polyester patch on a wool coat, it just doesn’t breathe the same.
Here’s what to consider:
- Lime Mortar Only – Use it on any building pre-1920 unless specified otherwise
- Match the Colour and Texture – Use pigments and test batches to get it right
- Respect Brick Hardness – Soft bricks can’t handle hard mortar
- Use Traditional Tools – They give better control over the joint finish
Bad restoration isn’t just visible, it can be destructive. Trapped moisture in old walls can freeze and expand, pushing bricks out of alignment or causing deep cracks.
If you’re not 100% sure what mortar to use, consult local conservation officers or heritage masons. This is where experience trumps shortcuts.
Mortar Lifespan, Maintenance & Repointing
No mortar lasts forever. Even the best job will need a revisit down the line.
General Lifespan:
- Cement-based mortar: 20–30 years
- Lime mortar: Can last over a century if maintained
When to Repoint:
- Gaps > 5mm
- Hollow-sounding joints
- Loose debris falling from the bed
Repointing Tips:
- Use matching mortar (in both strength and colour)
- Only repoint what’s needed, overdoing it can damage the bricks
- Pick the right season: avoid frost, rain, and direct sun during curing
A well-maintained joint not only looks sharp but keeps your structure safe from the elements. It’s small work that makes a big difference.
Want to level up your mortar game? Tradefox is a brilliant training platform for builders and bricklayers looking to sharpen their real-world skills, from mixing ratios to mastering the trowel.
They can be a goldmine for beginners who are just getting started
Final Thoughts
Mortar holds more than bricks, it holds the story of a building. Whether you’re starting from scratch or preserving a slice of history, the right mortar mix can make or break your project.
Think of it not as background material, but as a co-star in the performance. Strength, flexibility, and breathability all matter. And when in doubt? Mix conservatively, test thoroughly, and lean on old-school techniques.
Choose wisely. Lay smart. Built to last.